Halloween Shadowbox 3D Layered Cut File
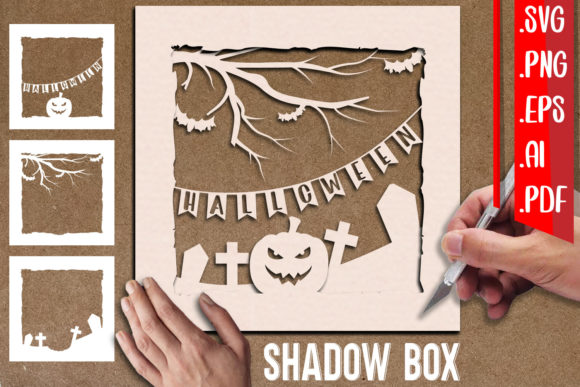
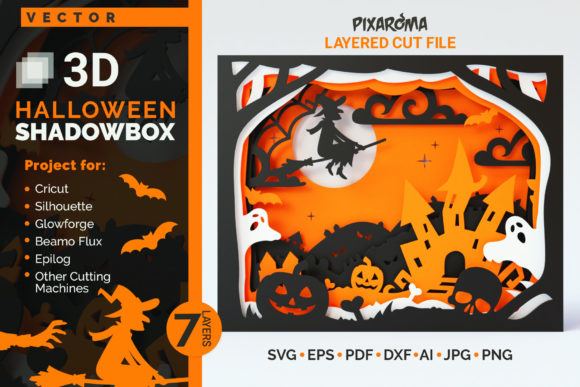
Halloween is often associated with fleeting decorations that disappear after November first. However, for the creative professional or dedicated hobbyist, there is a distinct satisfaction in creating art that lingers. The Halloween Shadowbox 3D Layered Cut File offers a sophisticated alternative to standard flat decals or store-bought ornaments. This digital asset allows you to construct a multi-dimensional scene featuring a flying witch, pumpkins, ghosts, bones, trees, and bats. It transforms a simple concept into a sculptural piece of wall art that commands attention through depth, shadow, and intricate layering.
Unlike traditional paper crafts that rely on single-plane designs, this file is engineered for spatial storytelling. By cutting multiple layers from materials ranging from heavy cardstock to thin plywood, you create a narrative landscape. The result is not just a decoration; it is a framed sculpture that plays with light and perspective, making it an ideal centerpiece for seasonal decor or a unique gift for design enthusiasts.
The Art of Dimensional Crafting
The core appeal of this project lies in its ability to turn a two-dimensional digital vector into a three-dimensional reality. When you download the Halloween Shadowbox 3D Layered SVG Cut File, you are acquiring a precise blueprint for complexity. Each element—the sweeping curve of the witch’s hat, the jagged edges of the haunted tree, the floating form of a ghost—is separated into its own layer. This separation is crucial. It allows you to control the focal point of the artwork by adjusting how far each element sits from the background.
This technique is particularly effective for Halloween themes because horror and fantasy rely heavily on atmosphere. Shadows create mystery, and depth creates immersion. A flat pumpkin is just a shape; a pumpkin that appears to float inches above a gnarled tree branch evokes a sense of magic and unease. By using double-sided foam dots, adhesive tabs, or specialized tape between each layer, you introduce physical space that catches ambient light. This interplay of light and shadow enhances the "spooky" aesthetic without needing electricity or complex lighting rigs.
Material Choices and Their Impact
One of the most exciting aspects of this cut file is its versatility across different mediums. The choice of material fundamentally changes the character of the finished piece. For beginners or those working on tight budgets, high-quality cardstock or craft foam is an excellent starting point. Cardstock provides a crisp, clean look that mimics the style of modern graphic design. It is lightweight, easy to cut with standard vinyl cutters like Cricut or Silhouette, and holds its shape well when layered with foam spacers.
For a more rustic or permanent installation, consider using basswood or birch plywood. Wood adds weight and permanence to the piece, turning it into a heirloom-quality artifact. The natural grain of wood can complement the organic shapes of the trees and pumpkins, while stained or painted layers can add rich, deep colors that feel less artificial than paper. However, working with wood requires a different approach to assembly. Instead of foam dots, you might use acrylic spacers, wooden blocks, or even hot glue applied strategically to maintain elevation without obscuring the visual lines.
It is important to note that while glue is a common adhesive, relying on it exclusively for layering will flatten your design. Glue bonds surfaces directly together, eliminating the air gap necessary for the 3D effect. To preserve the height and dimensionality, always prioritize spacers or elevated adhesives. This small technical detail is what separates a amateur craft project from a professional-looking shadowbox sculpture.
Step-by-Step Assembly Guide
Creating this artwork is a methodical process that rewards patience and precision. Follow these steps to ensure your Halloween Shadowbox 3D Layered Cut File results in a polished final product:
- Download and Organize: Save the digital file to your computer. Most files come in SVG format, which is compatible with major cutting software. Open the file in your preferred program (such as Silhouette Studio, Cricut Design Space, or Adobe Illustrator) to review the layer structure. Ensure all elements are aligned correctly before sending them to the cutter.
- Cutting: Load your chosen material—cardstock, vinyl, or wood—into your cutting machine. Use the appropriate blade settings for the thickness of your material. Thin materials may require a fine-point blade, while wood may need a deeper cut setting. Cut each layer individually or in groups as dictated by the file’s design hierarchy.
- Weeding and Preparation: Carefully remove excess material (weeding) from each layer. For intricate details like the bat wings or the witch’s broomstick, use tweezers to avoid tearing delicate sections. If you are painting or staining wood layers, do so now, before assembly, to avoid getting finish on adjacent pieces.
- Stacking and Spacing: This is the critical phase. Refer to the guide provided with the file to determine the correct order of layers. Typically, the background goes first, followed by mid-ground elements like trees, and finally foreground elements like the flying witch. Apply double-sided adhesive foam dots or tabs to the back of each layer. Start with the smallest dots for subtle depth and increase the size for elements meant to pop forward.
- Assembly: Stick each layer onto the one below it, ensuring perfect alignment. Take your time to check for straightness and symmetry. Once all layers are stacked, you have a cohesive 3D panel ready for display.
Creative Applications and Display Ideas
The finished shadowbox is versatile enough to serve various purposes. As a standalone piece, it makes a striking addition to a hallway, entryway, or living room mantle. The depth of the artwork draws the eye, inviting viewers to inspect the details up close. You can leave the layers exposed for a modern, minimalist look, or mount the entire stack inside a complementary shadow box frame with glass. Framing protects the delicate layers from dust and damage while adding a formal, gallery-like presentation.
Consider the context of where you place the art. In a home office, a smaller version featuring just the pumpkins and bats can serve as a subtle seasonal nod without overwhelming the workspace. In a classroom or library, a larger, brightly colored version can engage children and spark conversations about geometry, layering, and seasonal traditions. Educators can even use the cut file as a teaching tool, demonstrating how digital vectors translate into physical objects and how spatial arrangement affects perception.
For small business owners or Etsy sellers, this file opens up a revenue stream. Hand-crafted shadowboxes are popular gifts during the autumn season. By offering variations in color palettes—from classic orange and black to moody purples and greens—you can cater to diverse tastes. Marketing these items as "hand-assembled 3D art" rather than "printables" emphasizes the value of your labor and skill, allowing you to command higher prices.
Maintaining Clarity and Consistency
To keep your results clear and effective, consistency in layer spacing is key. If one section has thick foam spacers and another has none, the artwork may look uneven or distorted. Plan your spacer heights based on the importance of each element. Background elements should sit closer to the base, while foreground characters like the witch should be elevated highest. This gradient of depth guides the viewer’s eye through the scene naturally.
Additionally, pay attention to the negative space within your cut file. The areas between the bats, the branches, and the ghosts are just as important as the shapes themselves. They allow light to pass through and prevent the design from feeling cluttered. When cutting, ensure that no stray bits of material remain attached to the main shapes, as this can ruin the crispness of the silhouette. A sharp blade and a clean cutting mat are essential tools for achieving professional-grade results.
Ultimately, the Halloween Shadowbox 3D Layered Cut File is more than just a template; it is an invitation to experiment with scale, material, and composition. Whether you are a seasoned crafter looking for a new challenge or a beginner eager to try something beyond basic sticker making, this project offers a rewarding blend of technical precision and artistic expression. By embracing the layers and respecting the depth, you create not just a decoration, but a piece of environmental art that captures the spirit of the season in a tangible, lasting way.